http://www.tomsitpro.com/articles/vmware-esx-esxi-troubleshooting,2-810.html
For example, execute the following three commands on your system to gather route and NIC information.
 Figure 1: Checking the default route configuration on an ESXi host.
 Figure 2: Displaying physical NIC information.
 Figure 3: Displaying ESXi host virtual network adapter information.
 Figure 4: Gathering virtual switch information.
Collect all the information from your host and transfer it to your workstation or network drive for future reference. If you experience a failure or have to reinstall a host system, you can refer to these documents to rebuild the new system with the same configuration as the old one.
Once you've gathered all of your host system's information, you find that you want to change a particular parameter. For example, you find from running the esxcfg-info utility that the NFS MaxVolumes setting currently configured on your system is eight, which is the default. The maximum possible setting is 64. See Figure 5.
 Figure 5: Examining esxcfg-info NFS MaxVolumes configuration information.
You want to change this host's setting to 16. To change values observed from esxcfg-info, you must use the esxcfg-advcfg utility.
The esxcfg-info command gives you the setting value and the parameter name that you'll need in order to make changes to your system using the esxcfg-advcfg utility. If you know the parameter name, you can query it directly using the esxcfg-advcfg utility.
To understand the statement that esxcli replaces netstat issue the following command:
Another interesting use of esxcli is to kill virtual machines that are "stuck" and not responding to normal stop operations. This situation occurs when a host has experienced some fault and can't be placed into maintenance mode without some intervention. It's not recommended to use the "kill" functionality under normal circumstances.
To use esxcli kill, first list the host's virtual machines that are still powered on:
 Figure 6: Listing the powered on virtual machines.
To kill a virtual machine, you have to supply the type of kill: soft, hard, or force. You also have to supply the virtual machine's World ID. Requiring these explicit parameters avoids accidentally killing virtual machines by using the virtual machine name only.
If the "kill" command is successful, another "esxcli vms vm list" will return no data.
The "vmware" utility displays your version information. Have this information ready to give to a VMware support technician or to add to your incident ticket on the VMware incident support website.
For major troubleshooting, VMware support will likely prompt you to run the "vm-support" utility. This utility thoroughly checks your system and may take several minutes to complete. While running, you'll see a status checker and updates:
The vmdumper utility is a unique one for troubleshooting. Using it, you can successfully BSOD a Windows system or kernel panic a Linux system. To do so, issue the following command to list any running virtual machines:
 Figure 7: A Linux VM displaying the results of an NMI.
Unfortunately, a fully patched Windows 2008 R2 Server virtual machine wasn't as resilient. See Figure 8. Figure 8: Crashing a Windows virtual machine with an NMI signal.
VMware ESXi hosts provide the savvy administrator with 50 or so command line utilities for advanced data gathering and troubleshooting. ESX hosts and virtual management appliances (vMAs) boast a few more plus the full array of system utilities. You should familiarize yourself with connecting directly to your host systems via SSH in case you ever have to contact VMware Technical Support.
---------------
http://www.unixarena.com/2014/02/unable-power-virtual-machine-esxi-5-5-host.html
Unable to Power off Virtual Machine on ESXi 5.5 host
In some rare scenarios where you can’t even power off the virtual machine on VMware ESXi. This happens if the virtual host lost the I/O path or some issues related to I/O subsystems.In this situation,when you tried to power off the virtual machine,you will get error messages like “The operation can’t be allowed at the current time because the virtual machine has a question pending”.
In my case what i have done is that , attached the ISO file to virtual machine from one of the datastore and unfortunately lost the SAN path to that. So the virtual machine which i connected to ISO datastore went to “question pending” state and i am not able to reset or power off the host after that.
Here we will see how we can fix this issue on VMware ESXi 5.5.
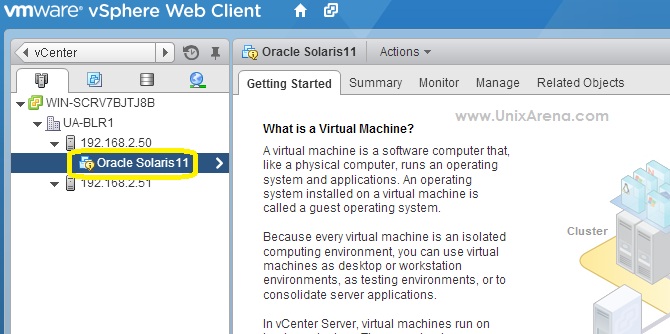
1.Open the browser and connect to VCenter web-client.
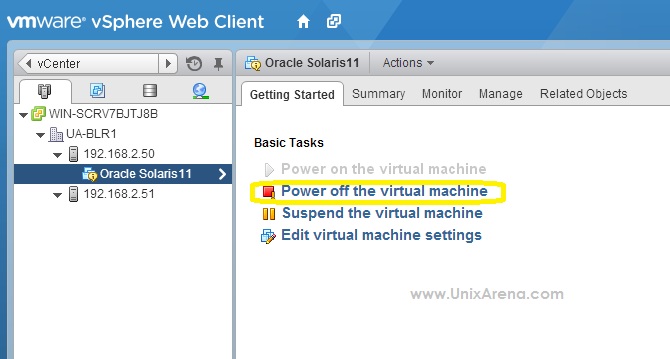
 2.I tired to power off the virtual guest but getting below error.
 3. Login to ESXi host where the virtual machine is running using ssh. In my case its 192.168.2.50
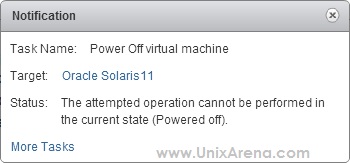
 You may get the below notification.Just ignore it.
 8.Edit the virtual machine and remove if you attached any file from non-existing datastore. (Ex:ISO files)
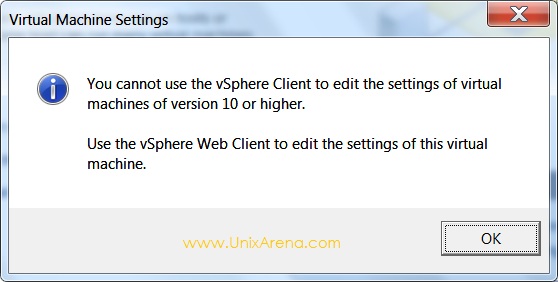
9.Tradition VSphere Client can’t edit the virtual machine since newer version(10) of virtual machines are only supported by VSphere web-client.You will get error like below one if you tried to edit from VSphere Client.
 10.Now you can power on the virtual machine.
 11.You can see virtual machine is powered on and its booting solaris11.
 Hope this article may help you to fix the issue.Please add in the comment if you have anything to share about this issue.
http://www.unixarena.com/2014/02/get-vmware-esxi-vcenter-license-keys.html
Managing the license on VMware ESxi and VCenter is one of main job for system administrator.After the installation of the product, you may need to add the new license to increase the capacity and you may need to remove the old license keys from the those products. Sometimes you may need to pull out the existing license keys for inventory purpose. Here we will see how we can manage the ESXi and VCenter server licence using VSphere Client .
How we can get the installed license keys of VMware ESXI servers and VCenter Server ?
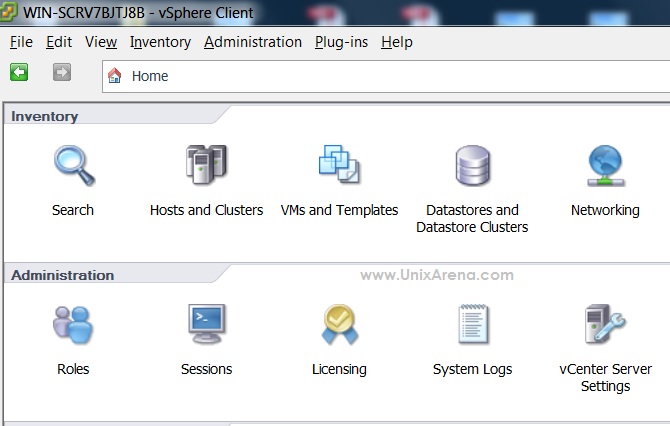
1. Login to VSphere Client and navigate it home.
 2.Navigate to Administration and Licensing .Here you can see the existing license of Vmware ESXI nodes and VCenter Server.
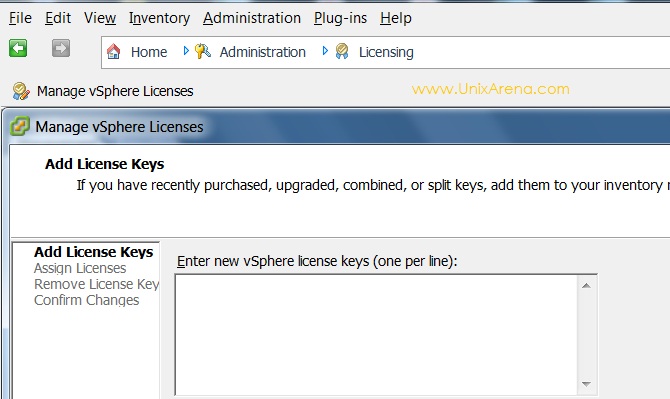
 3.In
order to install or remove the existing License keys , you need to
click on “Manage VSphere Licenses” (Step:2). This will popup the below
window to manage the VSphere License keys.If you want to add any new
license keys , you can just copy & paste one by one.
3.In
order to install or remove the existing License keys , you need to
click on “Manage VSphere Licenses” (Step:2). This will popup the below
window to manage the VSphere License keys.If you want to add any new
license keys , you can just copy & paste one by one.
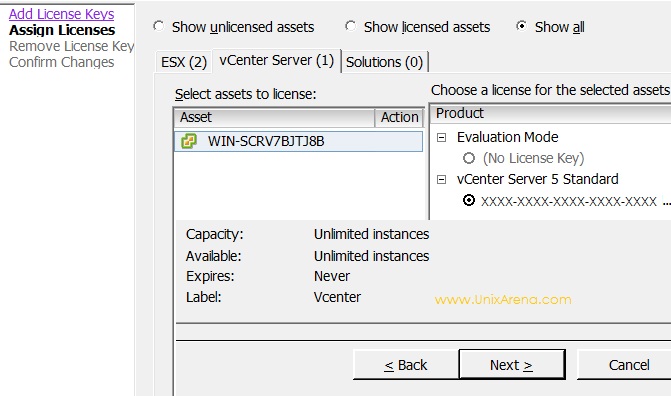
 4.The
next step will be assigning the specific license keys to the
products.In some cases, license may be purchased to run some limited
VM’s and that needs to assigned to specific host.In this case ,you need
to assign the license keys manually.For ESXi , you need to click on the
first tab. The below window shows vCenter Server licenses(Second tab).If
you want to remove any existing license keys ,you can remove it using
the next step. Once you have done,you click on the confirm changes.
4.The
next step will be assigning the specific license keys to the
products.In some cases, license may be purchased to run some limited
VM’s and that needs to assigned to specific host.In this case ,you need
to assign the license keys manually.For ESXi , you need to click on the
first tab. The below window shows vCenter Server licenses(Second tab).If
you want to remove any existing license keys ,you can remove it using
the next step. Once you have done,you click on the confirm changes.
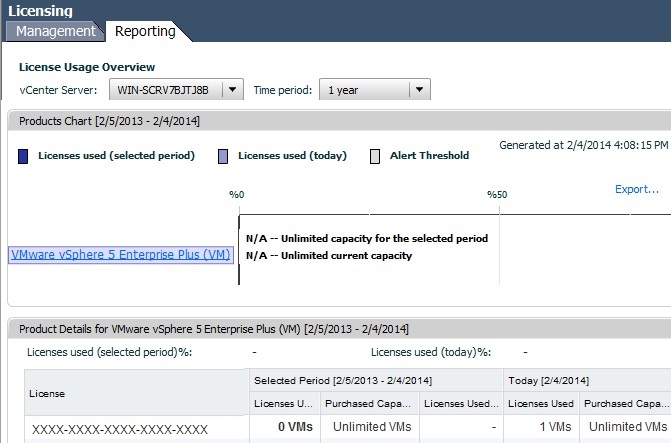
 5.You
can also extract the reports from the reporting tab. (Refer Image
Step:2). Once you click on the reporting tab , you will get window like
the below one.You can just click export to get the details in Excel
sheet.It provides complete usage details of the installed license
details.
5.You
can also extract the reports from the reporting tab. (Refer Image
Step:2). Once you click on the reporting tab , you will get window like
the below one.You can just click export to get the details in Excel
sheet.It provides complete usage details of the installed license
details.
 when
we are talking about VSphere licensing , i just want to let you know
about the free license of ESXi and vCenter Server. VMware offers 60
evaluation period for vCenter Server and ESXi .So you need to search for
free license keys of Vmware ESXi and vCenter server . You can install
and test these products with complete features for 60 days. After 60
days ,you may need to install the license keys to keep working on these
products. vCenter will not allow to administrate the ESXi nodes after 60
days without valid license keys.
when
we are talking about VSphere licensing , i just want to let you know
about the free license of ESXi and vCenter Server. VMware offers 60
evaluation period for vCenter Server and ESXi .So you need to search for
free license keys of Vmware ESXi and vCenter server . You can install
and test these products with complete features for 60 days. After 60
days ,you may need to install the license keys to keep working on these
products. vCenter will not allow to administrate the ESXi nodes after 60
days without valid license keys.
The below tables provides the licensing requirements of newer version of VMware ESXi and vCenter Server.
Thanks to VMware.
http://www.v-front.de/2013/09/how-to-update-your-standalone-host-to.html
http://www.v-front.de/2014/03/how-to-update-your-standalone-host-to.html
http://www.vladan.fr/easily-upgrade-esxi-5-x-to-the-latest-esxi-5-5-update-1-via-cli/
http://kb.vmware.com/selfservice/microsites/search.do?language=en_US&cmd=displayKC&externalId=2008939
http://www.vladan.fr/esxi-5-unresponsive-vm-h/
http://www.yellow-bricks.com/2009/04/15/the-basics-how-to-kill-a-vm-thats-stuck-during-shutdown/
http://www.virtualizationadmin.com/articles-tutorials/vmware-esx-and-vsphere-articles/general/how-to-access-the-vmware-esxi-hidden-console.html
Using the esxcfg Utilities
On ESXi 4.1 update 3 hosts, there are 20 utilities that all share the common esxcfg- prefix. To look at usage syntax for these commands, enter the following at a host prompt:# esxcfg-<utility> - - helpThe <utility> is one of the 20 unique utility identifiers. The esxcfg utilities include:
- esxcfg-advcfg
- esxcfg-dumppart
- esxcfg-hwiscsi
- esxcfg-info
- esxcfg-init
- esxcfg-ipsec
- esxcfg-module
- esxcfg-mpath
- esxcfg-nas
- esxcfg-nics
- esxcfg-pciid
- esxcfg-rescan
- esxcfg-resgrp
- esxcfg-route
- esxcfg-scsidevs
- esxcfg-secpolicy
- esxcfg-swiscsi
- esxcfg-vmknic
- esxcfg-volume
- esxcfg-vswitch
For example, execute the following three commands on your system to gather route and NIC information.
# esxcfg-route –l > balvenie-route.txt
Figure 1: Checking the default route configuration on an ESXi host.# esxcfg-nics –l > balvenie-nics.txt
Figure 2: Displaying physical NIC information.# esxcfg-vmknic –l > balvenie-vmknic.txt
Figure 3: Displaying ESXi host virtual network adapter information.#esxcfg-vswitch –l > balvenie-vswitch.txt
Figure 4: Gathering virtual switch information.Collect all the information from your host and transfer it to your workstation or network drive for future reference. If you experience a failure or have to reinstall a host system, you can refer to these documents to rebuild the new system with the same configuration as the old one.
Once you've gathered all of your host system's information, you find that you want to change a particular parameter. For example, you find from running the esxcfg-info utility that the NFS MaxVolumes setting currently configured on your system is eight, which is the default. The maximum possible setting is 64. See Figure 5.
Figure 5: Examining esxcfg-info NFS MaxVolumes configuration information.You want to change this host's setting to 16. To change values observed from esxcfg-info, you must use the esxcfg-advcfg utility.
# esxcfg-advcfg -s 16 /NFS/MaxVolumesThis command sets the MaxVolumes setting to 16.
Value of MaxVolumes is 16
The esxcfg-info command gives you the setting value and the parameter name that you'll need in order to make changes to your system using the esxcfg-advcfg utility. If you know the parameter name, you can query it directly using the esxcfg-advcfg utility.
# esxcfg-advcfg –g /NFS/MaxVolumesYou can issue the esxcfg-advcfg –g (get) command at any time to have a look at the current value of a setting.
Value of MaxVolumes is 16
| One word of caution before we leave the discussion of the esxcfg utilities: Use extreme discretion when issuing esxcfg-init commands. Generally speaking, you should only issue these commands under direction either of an advanced VMware Administrator or of a VMware Support Technician. |
|---|
Using the esxcli Utility
The general syntax of the esxcli utility is:esxcli [dispatcher options] <namesspace> <object> <command> [options]The esxcli utility might remind you of the very powerful Windows utility "netsh" in that they both use namespaces or contexts within you can view or alter various settings and configurations. The six namespaces that you can use with esxcli are:
- corestorage -- VMware core storage commands
- network -- Networking commands
- nmp -- Native Multipath Plugin (NMP)
- swiscsi -- iSCSI commands
- vaai -- VAAI Namespace containing vaai code
- vms -- Limited virtual machine operations
To understand the statement that esxcli replaces netstat issue the following command:
# esxcli network connection listYou will see a list of tcp and udp listening ports, established ports, some TIME_WAIT, CLOSE_WAIT, and FIN_WAIT statuses.
Another interesting use of esxcli is to kill virtual machines that are "stuck" and not responding to normal stop operations. This situation occurs when a host has experienced some fault and can't be placed into maintenance mode without some intervention. It's not recommended to use the "kill" functionality under normal circumstances.
To use esxcli kill, first list the host's virtual machines that are still powered on:
# esxcli vms vm list
Figure 6: Listing the powered on virtual machines.To kill a virtual machine, you have to supply the type of kill: soft, hard, or force. You also have to supply the virtual machine's World ID. Requiring these explicit parameters avoids accidentally killing virtual machines by using the virtual machine name only.
# esxcli vms vm kill –t soft –w 29156592You should attempt to kill an errant virtual machine with soft, hard, and force in that order so that critical data isn't lost in the process.
If the "kill" command is successful, another "esxcli vms vm list" will return no data.
Exploring the 'vm' Commands
Of the list of 25 "vm" commands under /sbin, you'll find a few useful utilities that you can use for troubleshooting. Three of the utilities are extended variants of the "lite" versions contained in BusyBox. They are: vmkping, vmtar, and vmcp. These versions function like the open source versions that you're used to having access to on your Linux systems. Use them instead of the standard system ping, tar, and cp. Note that the system ping command is a symbolic link to the /sbin/vmkping executable.The "vmware" utility displays your version information. Have this information ready to give to a VMware support technician or to add to your incident ticket on the VMware incident support website.
# vmware –lVMware ESXi 4.1.0 Update 3
# vmware –vVMware ESXi 4.1.0 build-800380
For major troubleshooting, VMware support will likely prompt you to run the "vm-support" utility. This utility thoroughly checks your system and may take several minutes to complete. While running, you'll see a status checker and updates:
# vm-support –l
Preparing files: /
When complete, the system gives you instructions that include:- The name of the collected support file.
- The incident support website.
- How to view the collected files.
The vmdumper utility is a unique one for troubleshooting. Using it, you can successfully BSOD a Windows system or kernel panic a Linux system. To do so, issue the following command to list any running virtual machines:
#vmdumper –lThe important pieces of information from this response are the displayName and the World ID (wid). You need the displayName to verify that you are crashing the correct system and the World ID is required for the vmdumper command.
wid=31885225 pid=-1 cfgFile="/vmfs/volumes/531f2d35-24323028-8423-0019b9b8fe1b/Automat/Automat.vmx" uuid="42 11 ad 85 88 38 ab d7-b4 d1 0d 35 ce 6c c0 b0" displayName="Automat" vmxCartelID=31881128
# vmdumper [World ID] nmi
# vmdumper 31885225 nmi
Sending NMI to guest...
Figure 7 below shows the screen of a Linux virtual machine (CentOS 6.5). The system received the NMI, but didn't fail.Figure 7: A Linux VM displaying the results of an NMI.Unfortunately, a fully patched Windows 2008 R2 Server virtual machine wasn't as resilient. See Figure 8.
Figure 8: Crashing a Windows virtual machine with an NMI signal.VMware ESXi hosts provide the savvy administrator with 50 or so command line utilities for advanced data gathering and troubleshooting. ESX hosts and virtual management appliances (vMAs) boast a few more plus the full array of system utilities. You should familiarize yourself with connecting directly to your host systems via SSH in case you ever have to contact VMware Technical Support.
---------------
http://www.unixarena.com/2014/02/unable-power-virtual-machine-esxi-5-5-host.html
Unable to Power off Virtual Machine on ESXi 5.5 host
In some rare scenarios where you can’t even power off the virtual machine on VMware ESXi. This happens if the virtual host lost the I/O path or some issues related to I/O subsystems.In this situation,when you tried to power off the virtual machine,you will get error messages like “The operation can’t be allowed at the current time because the virtual machine has a question pending”.
In my case what i have done is that , attached the ISO file to virtual machine from one of the datastore and unfortunately lost the SAN path to that. So the virtual machine which i connected to ISO datastore went to “question pending” state and i am not able to reset or power off the host after that.
Here we will see how we can fix this issue on VMware ESXi 5.5.
1.Open the browser and connect to VCenter web-client.
Question Pending – VM guest state

Question Pending – Error Log
login as: root
Using keyboard-interactive authentication.
Password:
The time and date of this login have been sent to the system logs.

VMware offers supported, powerful system administration tools.  Please
see www.vmware.com/go/sysadmintools for details.

The ESXi Shell can be disabled by an administrative user. See the
vSphere Security documentation for more information.
~ #
4.List the specific virtual machine process using ps command.
~ # ps -s |grep vmx |grep Solaris11
44991 44991 vmx                  WAIT   UPOL   0,1  /bin/vmx
44998 44991 vmx-vthread-4:Oracle Solaris11 WAIT   UFUTEX 0,1  /bin/vmx
44999 44991 vmx-vthread-5:Oracle Solaris11 WAIT   UFUTEX 0,1  /bin/vmx
45000 44991 vmx-mks:Oracle Solaris11 WAIT   SEMA   0,1  /bin/vmx
45001 44991 vmx-svga:Oracle Solaris11 WAIT   SEMA   0,1  /bin/vmx
45002 44991 vmx-vcpu-0:Oracle Solaris11 WAIT   IDLE   0,1  /bin/vmx
~ #
5.Try to kill the vpcu process of the guest using kill command.
~ # kill 45002
~ #
Still if the process is live ,use -9 signal to kill it.
~ # kill -9 450026.Check whether vmx process is running for that impacted virtual guest.If there is no process ,we are good to proceed to next step.If any process is running for that guest,kill those process as well.
~ # ps -s |grep vmx |grep Solaris11
~ #
7.Go back to web-client and try to power of the virtual machine now.
Power of the virtual guest
Power of Notification-VMware
9.Tradition VSphere Client can’t edit the virtual machine since newer version(10) of virtual machines are only supported by VSphere web-client.You will get error like below one if you tried to edit from VSphere Client.
Unable to edit virtual machine -VMware

power on virtual machine -VMware

Solaris virtual guest on ESXi
http://www.unixarena.com/2014/02/get-vmware-esxi-vcenter-license-keys.html
Managing the license on VMware ESxi and VCenter is one of main job for system administrator.After the installation of the product, you may need to add the new license to increase the capacity and you may need to remove the old license keys from the those products. Sometimes you may need to pull out the existing license keys for inventory purpose. Here we will see how we can manage the ESXi and VCenter server licence using VSphere Client .
How we can get the installed license keys of VMware ESXI servers and VCenter Server ?
1. Login to VSphere Client and navigate it home.
VMware Esxi & VCenter License

License Keys of VMware Esxi and Vcenter Server
Managing the License Keys of VSphere
Assigning the License keys
VSphere Licenses Reports
The below tables provides the licensing requirements of newer version of VMware ESXi and vCenter Server.
ata Center Virtualization and Cloud Infrastructure
| Existing product version | Version to be upgraded to | Is a new key required? | The SnS Contract for the product is active, can the license key be upgraded in My VMware Portal? |
| vCloud Suite (Standard, Advanced and Enterprise) | 5.1 | 5.5 | No | The existing license key also unlocks version 5.5 |
| 5.5 | - | No | This is the latest version | |
| vSphere or ESXi (Essentials, Essentials Plus, Standard, Enterprise and Enterprise Plus) | 4.x | 5.0 or 5.1 or 5.5 | Yes |
Yes.
|
| 5 | 5.1 or 5.5 | No | The existing license key also unlocks version 5.1 and 5.5 | |
| 5.1 | 5.5 | No | The existing license key also unlocks version 5.1 and 5.5 | |
| 5.5 | - | No | This is the latest version | |
| vSOM – vSphere with Operations Management (Standard, Enterprise and Enterprise Plus) | 5.1 | 5.5 | Yes |
Yes.
|
| 5.5 | - | No | This is the latest version | |
| vCenter Server (Standard and Foundation) | 4.x | 4.x or 5.0 or 5.1 or 5.5 | Yes |
Yes.
|
| 5 | 5.1 or 5.5 | No | The existing license key also unlocks version 5.0, 5.1 and 5.5 | |
| 5.1 | 5.5 | No | The existing license key also unlocks version 5.1 and 5.5 | |
| 5.5 | - | No | This is the latest version |
http://www.v-front.de/2013/09/how-to-update-your-standalone-host-to.html
http://www.v-front.de/2014/03/how-to-update-your-standalone-host-to.html
http://www.vladan.fr/easily-upgrade-esxi-5-x-to-the-latest-esxi-5-5-update-1-via-cli/
http://kb.vmware.com/selfservice/microsites/search.do?language=en_US&cmd=displayKC&externalId=2008939
http://www.vladan.fr/esxi-5-unresponsive-vm-h/
http://www.yellow-bricks.com/2009/04/15/the-basics-how-to-kill-a-vm-thats-stuck-during-shutdown/
http://www.virtualizationadmin.com/articles-tutorials/vmware-esx-and-vsphere-articles/general/how-to-access-the-vmware-esxi-hidden-console.html


